This time it is a new year wall paper, although i am late for it. This is also a simple wallpaper, no complex operations required. Again i have used the flame plugin and had the X effect. Follow the guide and see if you like it.
Process
-
Create a new image with white background, at your best monitor resolution.
-
Download the Select Bazaronite font, from the attached files section. Install the font. Select it and type in 2009 set a moderately big size say 225 or 250 . From the layers toolbox merge the layer with the white background. Name this layer “2009”
-
With the “2009” layer selected, apply a long outward zoom motion blur
Filters -> Blur -> Motion Blur :
{
  Blur Type: Zoom;
  Length: 67 (big value)
  Blur Outward: cheked
}
When applying the motion blur be sure the center of the blur (x,y) is selected on the center of the text, so that the blur effect is symmetric on both the sides of the text.
Then apply a bit of radial blur:
Filters -> Blur -> Motion Blur :
{
  Blur Type: Radial;
  Length: 3 (small value);
}
Here also select the center so that it is on (almost) the center of the text.
-
Then give some video lines distortion to this text as described below:
Filters -> Distorts -> Video :
{
  Video Pattern: Striped;
  Additive: Checked;
  Rotated: Unchecked;
}
After this we have finished with the “2009” layer.
-
Now select the 2009 layer in the layer tool box and colorify the layer from white to alpha, so that only the 2009 text is there.
Colors -> Colortfy to Alpha:
{
  From White (#ffffff) to alpha
}
Crop (or autocrop) this layer and isolate the text, and make the layer smaller.
Layers -> Autocrop Layer
Add a new layer with black color #000000, name it “back” and shift “back” to the bottom.
This brings a 2009 fading out effect. The above steps are integrated in the below screenshot picture

-
To create the next text I have used the HalfLife2 font, found in the HalfLife2 game. You can download it from the attached files section. This is not a free font. Install the HalfLife2 font. And select it. Create a new text layer and type in 2010. Make the text colour white and the size smaller than that of the “2009” text but not too small (say 200). Then Create a new black (#000000) layer, keep the 2010 text layer on top of the new black layer and other layers below them. Merge the 2010 text layer into the new black layer, and name this layer to “2010”
-
Apply softglow to “2010” . Keep the glow radius medium.
Filters -> Artistic -> Softglow :
{
  Glow Radius: 28
  Brightness: 0.8
  Sharpness: 0.9
}
Then autocrop (or crop) 2010 layer, so that the whole text and the glow fits. And apply colorify to alpha to convert the black to alpha in this layer
Layers -> Autocrop Layer Colors -> Colorify to Alpha: { From #000000 (black) to alpha } -
Now we create the reflection of 2010. From the layers box, copy 2010 layer, and name it “2010_ref”. shift this layer just below the “2010” layer in the layer stack from the layer tool box
Then select the Flip Tool from the tool box, select flip type to Vertical, and click on the 2010_ref image and flip the layer.
Position “2010_ref” under “2010” layer, so that the “2010” layer bottom almost touches the “2010_ref” layer top.
-
Select the below portion of the “2010_ref” layer including the bottom half of text. Feather selection to about 150px to 200px, and then press delete button once to get the faded effect.
Adjust opacity of “2010_ref” from the layers window and set it 50% to 55%:
The above step screenshots are integrated into the below image.

-
Now the flame part. Either you can generate your own flame pattern or use the one i have generated, by downloading it from the attached files section. To use it, load the file, download the file, open the flame dialog box, click open and browse and select the file.
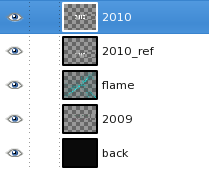
First create a new transparency layer, where the flame will be rendered. Name this layer “flame”. Keep this layer below layers “2009”, “2010”, and “2010_ref” and top of “2009” and “back”. Then apply flame on it. When applying the flame, zoom the flame from the flame control box, so that the flame completely fills up the layer. Adjust the zooming of the flames to get the desired effect. Also adjust the gradient for different colours. I have used the “Neon Cyan” gradient. Select this from the gradient tool from the tool box, then from flame control box select custom gradient.
Filters -> Render -> Nature -> Flame
-
If the flame will look very flashy, so we will make some adjustments to it. Open the curves box and select the alpha channel and the. Keep the high tones as it is, and decrease the low and mid tones so only the high tones gets which are highlightes the flame is prominent. Blur the flame once, or leave it as it is. Blurring the flame will lead in a blurry and blunt flame formation, although it is not bad, and depends o taste.
-
After this the image and the layers might some reposition on the screen, like you might like to place the layers in center of the screen, or on the upper part. And I have re-coloured the “back” black later from #000000 to #0a0a0a . Although this might seem unnecessary , but this visibility affects the picture. The less prominent and almost invisible parts of the flame is not visible. Also the flame might need some tuning. The layers might need some resizes etc.
And we are done. Have a look at the final layer layout and then checkout the final product.

Attachments
Bazaronite Font : Download Bazaronite font here
HalfLife2 Font : Download HalfLife2 font here or download it from here
GIMP Flame File : Download the GIMP flame file used in this tutorial here
Final Product
For 2010


Thanks for posting…looks very cool. Im going to try this.
thanks for tutorial, how make 3D with GIMP?
Great! This one is nice too : http://igamek.com/category/wallpapers/
what a beautiful wallpaper you have, sweet and i like it, thank for sharing. keep up the great work.
nice one..simple but cool.. will try that someday..thanks!
hi! as i’ve mentioned below, i plan to try this someday.. is it okay if i repost the tutorial in my blog? of course i’ll acknowledge your site as my link… :)
No problems at all. All the posts are licences under Creative Commons Attribution-Share Alike 3.0 Unported License , as stated in the https://phoxis.org/about/ page. Also try some more innovations on this one .
Hi there, thank you for this tutorial, however, you had me confused all over the place and I simply gave up on this one. The outcome you did looks great. Too bad I was not able to finish this one.
Hello there. I can help you where you lost the track.